
Android Custom Recovery (MTK) Without PC or Route And Flash Recovery A-Z Tutorial
Android Custom Recovery (MTK) Without PC or Route And Flash Recovery A-Z Tutorial for you
Because of not having a PC, who can not make customization of their mobile, they showed a tutorial on how to make a custom recovery for their own phone via mobile, many of them have failed to work through the postal flow. So how easy is your phone for your Anrut Without PCs, you will be able to make a custom recovery through mobile? If you do not do it then you will not understand. And do all the tasks as self-employed, because of the work of the Ad Levance Lev.
Whatever it takes:
1.Mediatek Chipset 65XX Phone
chipset checker (if you do not know chipset)
2.image kitchen for Android.apk
3.root explorer.apk
Step-by-step
Step-1:
Depending on your android’s chipset, remove anyone twrp recovery.img from google and rename it to recovery.img.
(If your chipset is mtk6582, then typing google from twrp recovery chipset mtk6582 search and delete it)
(If your chipset is mtk6582, then typing google from twrp recovery chipset mtk6582 search and delete it)
Step-2 of Job:
Extract the stock recovery. image file from the flash file with the Root Explorer app and get the extracted file in the speed software-extract folder.
Do not just keep the speed software twrp recovery by Google chipset, otherwise, there is a problem to unpack next
Step-3 of Job:
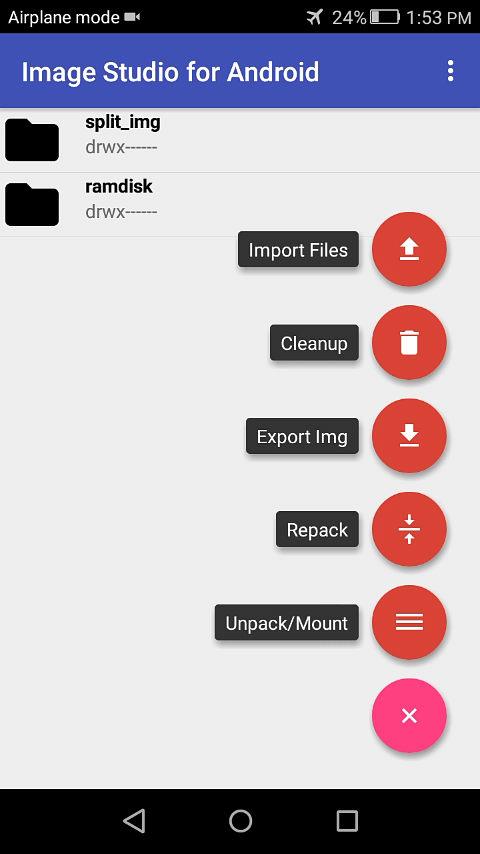
Image kitchen for android Visit the Apato
Click on the unmark and click on the stock recovery.img file to see two files will be extract 1.spilit_img 2.rmdisk
Click on the unmark and click on the stock recovery.img file to see two files will be extract 1.spilit_img 2.rmdisk
From here, press the spilit_img file and export it in memory and clean up the bag
Skin shot-
Skin shot-
Step-4 of Job:
Now you can get up to google twrp with step-4 like image kitchen android app and get up to 2 files as you like 1.spilit_img 2.rmdisk
Drop down spilit_img and delete it.
Now click on Import from option and bring the spilit_img of stock recovery.img in memory and click Repack option.
Drop down spilit_img and delete it.
Now click on Import from option and bring the spilit_img of stock recovery.img in memory and click Repack option.
Step-5 of Job:
Repack complete will see a number of files like skin site –
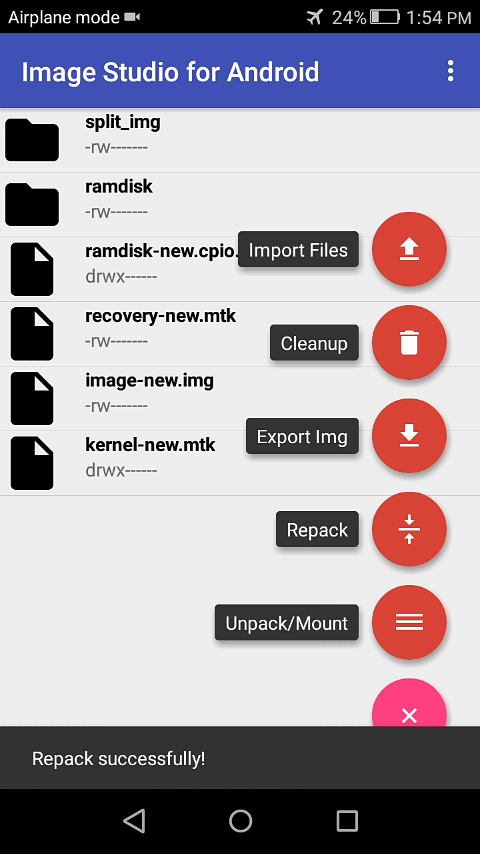
From here, import the image-new. image file into memory and then rename it to your custom recovery.image file.
Custom Recovery Flash made rules
Whatever it takes
1.Computer
2. USB drive home
Download Link- Click Here
3. sp flash tool.exe
Download Link- Click Here
4. The phone’s flash file
5.Custome recovery.img which made the above rule
2. USB drive home
Download Link- Click Here
3. sp flash tool.exe
Download Link- Click Here
4. The phone’s flash file
5.Custome recovery.img which made the above rule
After downloading, extract all the files, install the USB drive
Step-1:
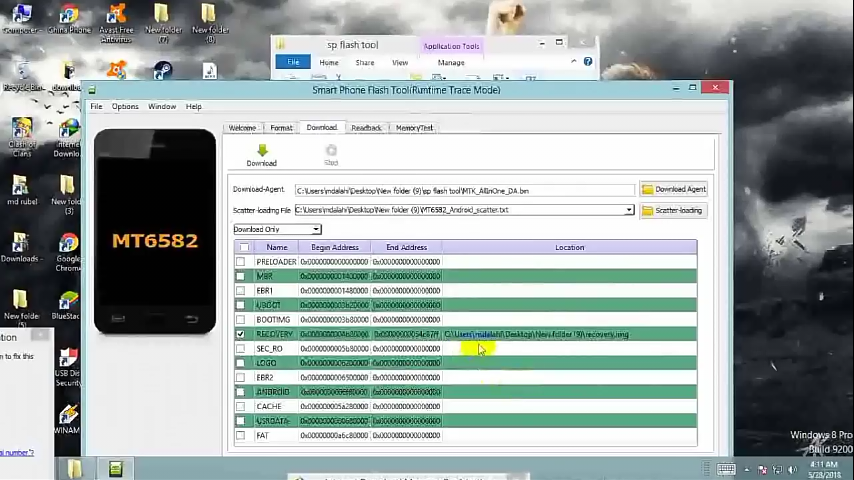
Extract the scatter file from the flash file and place two cooked custom recovery and scatter files in one folder.
Extract the scatter file from the flash file and place two cooked custom recovery and scatter files in one folder.
Step-2:
Open the Sp flash tool, click on the flash tool option, click on scatter load, and go to Step 2, and show the scatter file from the folder. Find the recovery. image file.
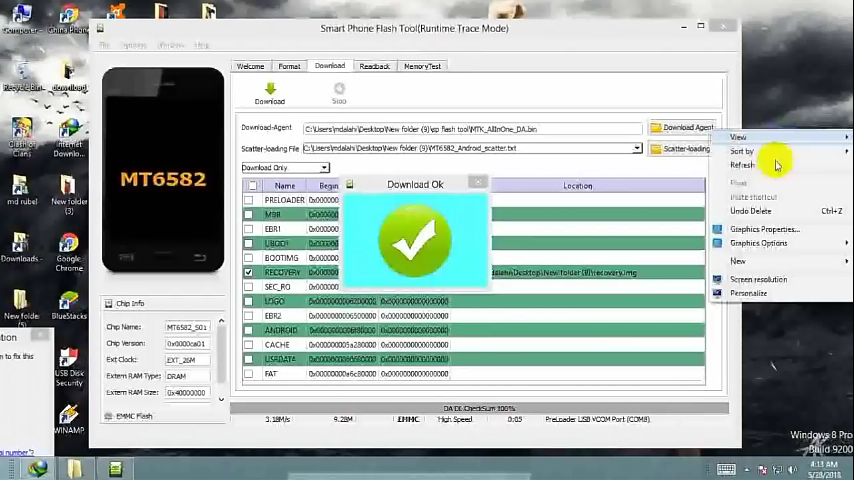
Now by clicking Download, connect your phone to USB cable
Download √ Actually the flash has been complicated,
Now by clicking Download, connect your phone to USB cable
Download √ Actually the flash has been complicated,
Step-3:
Do not turn on the phone (will not be turned on) Volume up and hold the power button and go back to the recovery mode. It is up to your custom recovery.
Now you can flash any other zip file from the recovery mode and flash your phone by flashing the supersu.zip file.
Now you can flash any other zip file from the recovery mode and flash your phone by flashing the supersu.zip file.
If you understand the problem, please comment and explain to the chest.
Courtesy:tips-box.com


Comments
Post a Comment